


The world around us is surrounded by the thrilling wonders of science. Growing up, be it swinging on a monkey bar, mixing colours for an art project, or even talking to our best friends using paper cup phones attached to a string, it is science that explains how these ‘magical’ moments are possible.
Since children do not know what they don’t know, it is up to us parents, guardians, and educators, to intentionally explain the science behind each of these little joys and fill their minds with knowledge. This also helps to preserve their sense of wonder as they pursue big questions about the world, even if they are stuck at home due to the pandemic.
Today, we are seeing more young people value science and STEM subjects. Findings from this year’s 3M State of Science Index (SOSI), an annual, third-party study commissioned by global science company 3M, echoed this sentiment. In Singapore, 82% agree that young people are more engaged in science and science-related issues than ever before (vs. 69% globally).
To ensure that the appreciation of science remains high, we need to continue fostering curiosity and encouraging our young ones to unleash their inner scientists. Through these five (5) easy at-home experiments, you can help contribute to the growth of STEM by stimulating your child’s mind and having fun in the process.
Be sure to test out the experiment yourselves before trying it with your little scientists as the activities listed below would require parental supervision.
1. Watch your water walk overnight
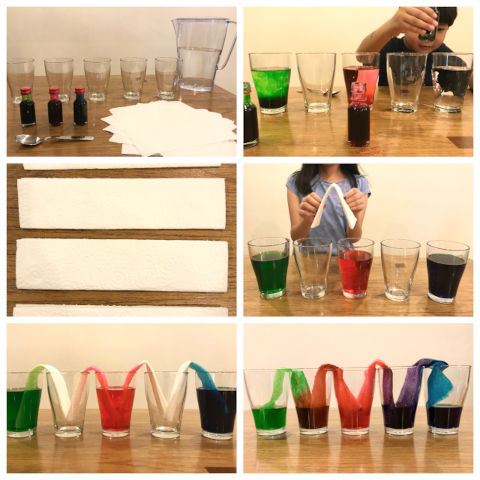
A challenge for you: Move the water from one glass to another, without touching the glasses.
Materials needed: Five clear glasses, water, two to three different colours of food colouring, a spoon and five paper towels.
To do this:
- Arrange five glasses in a row, alternating coloured water in one glass followed by an empty glass. Use a spoon to mix the food colouring in each filled glass. Use a paper towel to wipe off the spoon in between glasses, so you don’t transfer the colours.
- Fold a one-inch-wide piece of kitchen towel into a ‘V’ shape. Repeat this step to get four pieces of the same kind. The ‘V’ should be only slightly taller than your glasses.
- Flip the ‘V’ shape upside-down and put one end in each cup to form a ‘bridge’ connecting the adjacent glasses by inserting the kitchen towels. Ensure the kitchen towels are long enough to be soaked in the glasses of water.
Due to capillary action, you will find that the water has “walked” over into the clear containers overnight, forming new colour mixes. Your child will be wow-ed when he/she wakes up the next day.
2. Make your own lava lamp
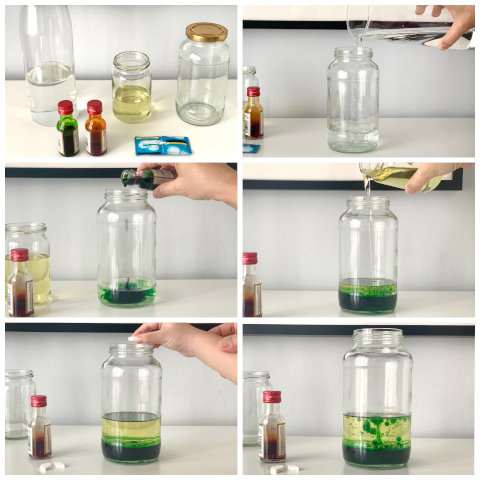
Even if you stir vigorously, water and oil will never mix due to density (the amount of mass per unit of volume).
Materials needed: A clear glass or mason jar, water, vegetable or mineral oil, food colouring, sodium bicarbonate tablets, and a flashlight (optional).
To make your own DIY-lava lamp:
- Fill a quarter of the clear glass with water and add several drops of your chosen food colouring before filling the rest of the glass with oil (not to the brim).
- Break a sodium bicarbonate tablet into smaller pieces and drop one of the parts into the glass. Observe what happens.
- Place the glass on top of a large flashlight, turn off the lights in the room and drop in another piece of the sodium bicarbonate tablet. Now you have a lava lamp!
You can bet that your child will be stirring and shaking them to see its effects!
When you drop a sodium bicarbonate tablet into the glass, it sinks straight through the oil without any chemical reactions occurring. When it touches the water, however, a chemical reaction occurs that releases carbon dioxide gas bubbles. These bubbles are less dense than the water or the oil, so they float to the top—but they “stick” to the water, dragging some water droplets up toward the surface with them. When they reach the surface, the gas bubbles pop and the water droplets sink back to the bottom—creating a lava lamp effect.
3. Get messy with a rainbow bubble snake
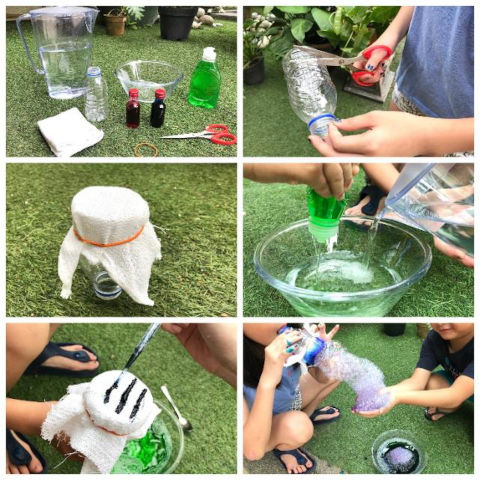
Take a break from the at-home chaos and bring your children outdoors for fresh air and messy play.
Materials needed: A small plastic bottle, a washcloth or thin towel, a rubber band, food colouring, water, dish soap, a small bowl, and a pair of scissors.
Through the gasses from your breath, create different coloured ‘snakes’ made of bubbles:
- Look through your pile of recyclables and get yourself a clean, empty plastic bottle.
- Ask for an adult’s help to cut off the bottom of the bottle (½ inch) and use a rubber band to fasten a washcloth or thin towel to the opening that has been cut.
- Here’s where you get to explore your creativity: Add different food colourings and create patterns on the towel before dipping it into a mixing bowl of dish soap and water.
Take a deep breath and blow with force into the mouthpiece to form a long colourful bubble ‘snake’. This will keep your child entertained for a good 15 minutes, guaranteed.
Bubbles are pockets of soap and water that are filled with air – like your breath, which contains nitrogen, oxygen, and carbon dioxide. When you combine soap and water then blow air into the mixture, the soap forms a thin wall and traps the air – creating a bubble! The soapy film is composed of three layers: one layer of water molecules between two layers of soap molecules. Millions of these molecules will stick together to form the spherical shape of a bubble.
Learn more about this experiment at the 3M Science at Home.
4. Build a tower with marshmallows
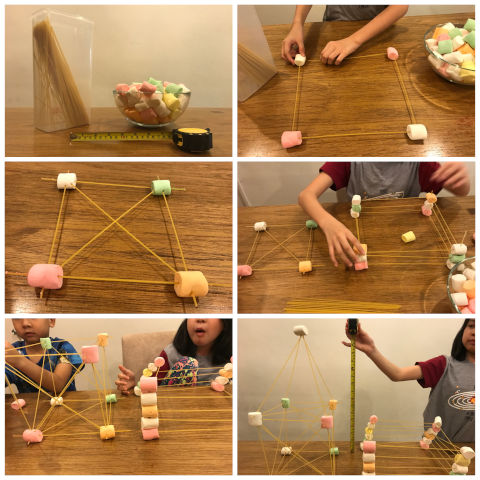
A meal enjoyed by people of all ages. A treat coveted by sweet tooths. That’s right, we’re talking about spaghetti and marshmallows. But wait, they can do more than satisfy our food cravings, they can also satisfy our craving for knowledge and creativity! How tall can you build a structure using only marshmallows and uncooked spaghetti?
Materials needed: A box of uncooked spaghetti, a bag of marshmallows and a ruler or measuring tape
Before we begin, let’s imagine how we should build our tower so that it is stable and sturdy. Let your creativity wander as you follow the steps below:
- Find a clean workspace.
- Using the marshmallows as joints, and the spaghetti as beams, try to build the tallest tower that you can.
- Once done, use a ruler or measuring tape to measure the height of your structure.
By experimenting with different types of structures and builds, you will observe that the most effective towers have wide, sturdy bases, and use triangles and pyramids as support structures. Triangles are a great structure to make because they are the only shape where you cannot change the angles that the sides make without changing the length of the sides. This makes them very sturdy and able to support things well. Having a wide base gives the tower lots of stability and allows for better weight distribution.
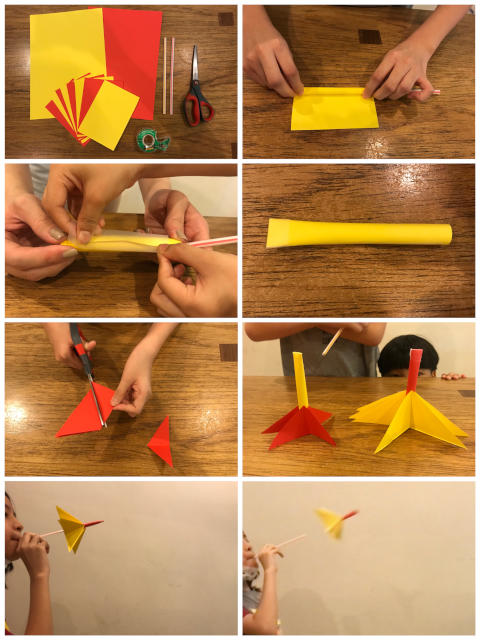
5. Blast off with a paper rocket
Preparing our children for different stages of life may seem like rocket science but let’s take a step back and enjoy the time we have together with some paper rocket science.
Materials needed: 2 pieces of paper, scissors, drinking straw and tape
In science, we learn that variables may affect the outcome of an experiment. Let’s explore how different designs can change the way your rocket propels:
- Fold a piece of paper into four and cut them into smaller rectangles.
- Take one of the small rectangles and roll it around the straw to make a tube (not too tight). Tape the tube you have made so it stays rolled up.
- Next, pinch and tape one end of the tube to make the nose of the rocket.
- With a different piece of small rectangle paper, cut some right-angled triangles to make fins before taping them onto the tube.
- Repeat steps to make a few rockets with different tube lengths and/or different numbers of fins.
Place the rocket on the straw and blow for blast off. When you are experimenting, you may realize that some changes make a bigger difference than others. Once you have an idea of what changes are the most important, try designing a rocket that can go the farthest, or fly the most accurately.
Find out what other experiments 3M scientists are sharing by watching the videos at the Science at Home webpage. Hopefully, these experiments can help inspire your child and ignite their passion for science and learning.
Please note: Participation in any of the experiments and activities in this Article is at your own risk. Parents or other adults must supervise any experiment or activity involving a child. To the extent permitted by law, 3M and its affiliates, employees, directors or agents shall not be liable to any person in any manner for any activities or experiments related to this Article.
* * * * *
Like what you see here? Get parenting tips and stories straight to your inbox! Join our mailing list here.
Want to be heard 👂 and seen 👀 by over 100,000 parents in Singapore? We can help! Leave your contact here and we’ll be in touch.